
Most gardeners are familiar with worm castings. They’re one of the best organic fertilizers and composts out there. You can generate your own castings using your kitchen scraps and a worm composter, also called a vermicomposter. But what is the best worm composter, and how do you choose with the wide variety that are out there?
We’ll break down each type of worm composter for your perusal and help you to make the right choice for your needs. Each type is a little different and has different features, so we get into the nitty-gritty of those features too. Let’s get started!
| Product | Features | ||
|---|---|---|---|
 | Best OverallUrban Worm BagBest Overall |
| Check Epic Price |
 | Best StackableWorm Factory 360Best Stackable |
| Check Amazon Price |
 | Best ValueVermiHut 5-TrayBest Value |
| Check Amazon Price |
 | High EndHungry Bin ComposterHigh End |
| Check Amazon Price |
 | Traditional BinRedmon Green CultureTraditional Bin |
| Check Amazon Price |
5 Best Worm Composters Reviewed
Let’s take a detailed look at some of the best worm composters on the market and see how they work.
1. Urban Worm Bag

Flow-through systems are all the rage for those who aren’t a fan of stackable systems like the Worm Factory 360. This one, in particular, is made with 900 denier Oxford fabric, meaning it’s breathable but won’t allow in any flies, etc… a common problem in other systems.
It’s capable of holding up to 5 cubic feet of vermicompost, but most importantly has an easy-harvest zippered bottom that makes getting fresh castings out of the system an absolute breeze.
I honestly cannot rave enough about the ease of this bag. The large surface space and good depth enables me to use all types of composting worms. It can hold huge quantities of worms, allowing me to produce worm castings much faster. And best of all, I don’t have problems with moisture control, which has long been an issue with other types of bins.
This is my current go-to worm bin for daily composting. I’ve used it for a year now every day and it is hands down the most user-friendly and effective worm composter that I’ve ever used.
2. Worm Factory 360
- The Worm Factory 360 has a standard 4-Tray size...
- The redesigned lid converts to a handy stand for...
- Includes digital instructional manual with...
The Worm Factory 360 is the easiest system to use. It arrives out of the box with four trays, a lid, and a base with a built-in leachate collector and spigot. To use it, just add your bedding and your worms, then feed. As you slowly fill up trays, you gradually add more trays with bedding and food on top. The worms easily slip through the holes in the bottom of each tray, working upward to the freshest food source.
By the time you fill the fourth tray, all of the worms should have finished eating the bottom tray and have worked their way up, and the bottom is ready to harvest. The lid acts as a handy stand for the other trays while you’re removing the bottom tray. The leachate collector base keeps excess moisture away from your worms and allows for easy drainage.
It’s expandable up to eight trays, which means you don’t have to rush to harvest your finished compost and can store it right in the Worm Factory.
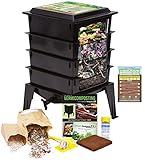
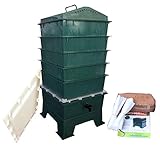
3. VermiHut 5-Tray
- Better air-flow control, high compost efficiency,...
This composter is also a tray system, so it works very similarly to the Worm Factory 360. However, it’s a 5-tray system and extra trays aren’t available, so you’ll need to harvest the lower trays as they are finished rather than storing compost under the colony. It also has a built-in spigot and leachate collecting basin, and the angled lid provides a little extra rain-shedding capability for outdoor use.
Overall, this is a great unit for people who’re just starting out and who can use their castings year-round rather than store them.
4. Hungry Bin Composter
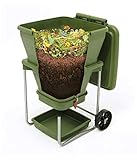
- ✔️ EASY TO USE: The Hungry Bin is a continuous...
- ✔️MULTI-USE: Not only can you make the highest...
- ✔️FAST AND CLEAN: Hungry Bin processes up to...
The Hungry Bin is a flow-through system rather than a tray system. When it arrives, you set it up, place the leachate catch-tray underneath, and add your bedding and worms at the bottom, then gradually add food on top. As the worms eat, the castings fall down to the bottom of the composter, creating a layer of ready-to-use castings. When you’re ready to harvest, just follow the instructions on how to open the base and scoop out your finished compost.
It does have a sizeable price tag, but flow-through systems like this eliminate the need for stacking up excess trays elsewhere, and it provides year-round compost in a small footprint.
5. Redmon Green Culture 65-Gallon Compost Bin

- Convenient snap on lid
- Four access doors and top snap on lid to retrieve...
- Easy to assemble (instructions included - NO tools...
If you are looking for the easiest solution possible and want your vermicomposter outdoors, this bin can work. This is a traditional compost bin that can handle a huge quantity of kitchen waste, leaves, trimmings, and other compostable materials with ease, and since it lacks a bottom and sits directly on the soil, any leachate drains out into the ground.
Most people forget that worms can live inside a traditional compost unit like this, too! If you add fresh food for them regularly, the worms you’ve added will stay in and under your bin and continue to rapidly break down your waste into castings. But if you’re adding worms, definitely keep this bin in the shade to prevent them from overheating.
If you stop feeding more appealing kitchen scraps with regularity, they may start digging down into your soil and going in search of other food, so you have to make sure you’re feeding regularly.
How Does Worm Composting Work?

The simplest explanation of worm composting is one sentence: “Worms eat my kitchen scraps.” In essence, you provide a home for the worms (the composter), some lightly-moistened bedding, and food, and they give you fantastic compost.
Any fruit or vegetable scraps, leftover pasta or bread, leaves, coffee grounds, eggshells, and even some manures are great food sources for worms. Avoid feeding them meats or oils that tend to go rancid and smell bad (not because they can’t handle them, but because they smell bad). Adding large quantities of acidic foods all at once can actually irritate tender worm bodies and increase the pH of your bin, so go easy on acidic stuff. And of course, never add inorganic materials like plastic or non-compostable materials like metal or glass, as the worms can’t eat those.
Eventually, it will be time to harvest your castings for use. Depending on the composter, this process will vary, so we’ll talk about that further on.
What To Look For In A Worm Composter
While you can DIY a worm composter out of almost any box or bucket, there’s a few things which rudimentary types lack that are available in commercial vermicomposters.
Drainage. If you’re adding a lot of fruit or vegetable matter, especially stuff like watermelon rinds or other wet materials, it will produce a liquid that’s referred to as “worm tea” or leachate. Your worms don’t want the extra moisture and can actually drown if there’s too much, so a spigot or other draining method for leachate is required.
Incidentally, the leachate itself does contain some nutrients and can be used as a fertilizer source, but with one caveat: As it doesn’t go through the worm’s gut and get digested, it may have pathogens that haven’t been eradicated, so it’s not safe for use on edible plants. If your vermicomposter has a spigot, you can drain off the leachate regularly, mix it at least 50/50 with water, and spread it on your lawn or on the soil in a flower garden. It can also be added to a hot compost pile, as the heat will kill any pathogens in the leachate.
Ease of Harvesting Castings. You can make a composter out of a bucket with holes drilled in it for drainage… but you’ll have to pull out all of the worms, their remaining bedding/food, and their castings and manually separate them all. Most commercial composters provide alternatives which don’t disturb your colony. The less you disturb your colony, the quicker they will reproduce and make you great castings, so a built-in option that makes the process easy is ideal.
We’ve got some great hints for harvesting worm castings, but in the end, a system that makes it even slightly easier will speed up your collection process!
Composting Space. If only one person is producing waste food for the worms, you probably don’t need a very big composter, nor a whole lot of worms. But what if your family grows and you start producing a lot more compostable waste? Ideally, you’ll want a composter that can expand with your needs, allowing your worm colony to breed and expand as well.
Not only that, but if they have room to grow in, worms will breed. You can start with only a thousand worms and end up with many thousands chomping away at your waste and creating black gold for you. Surface space is key to this process, as the worms self-regulate their populations. If there’s not enough room in the bin for them to have babies, they just won’t do it. So extra space gets you a constant supply of young wigglers ready to devour your scraps.
Shade. Worms naturally live well away from sunlight, so you want your composter to simulate that natural environment as much as you can. Choose a composter that’s opaque so that it can block excess light. This helps the worms to be happy, and the happier they are, the more they’ll eat!
Ventilation. Composting worms need to breathe just like we do. Ensuring that they have a well-ventilated composter is a must. If it’s not ventilated enough, you can start to have issues with too much moisture in the bin. The last thing you want is to drown your worms.
Protection From the Elements. If you plan on putting your composter outside, you need a lid to keep rain out, and you need to place it in a shady area so it doesn’t get overheated in the sun. If you’re putting it indoors, you can opt for a different setup, but you will need to make sure it’s still somewhat climate-controlled. When it’s too cold, worms get sluggish. Too hot, and they’ll try to escape. A good vermicomposter should be able to protect your worms from adverse conditions where it’s going to be placed at all times.
What Else Do You Need To Start?
You’ve chosen a worm composter. What else do you need to start vermicomposting?
Well, live composting worms, of course. The best composting worms are red wigglers or European nightcrawlers, both of which are available for purchase. Common worm species used for the purpose include Eisenia fetida, Eisenia hortensis, and Perionyx excavatus. Unfortunately, the earthworms that are common in many areas just don’t eat enough, so they aren’t as useful in your colony. 2000 worms will eat about 1 pound of food every 24 hours, so make sure you get enough for your bin and waste production levels.
You also need bedding for the worms to live in. My personal favorite is coconut coir. I prefer either moistened coco pith/peat or maybe a fine coco fiber, as coco chips don’t provide a soil-like environment. You can also use finely shredded newspaper or cardboard that’s been lightly dampened. I recommend adding a couple of scoops of garden soil and mixing it into the bedding as this provides the grit worms need to digest their food. They can also use coffee grounds, rock dust, or powdered eggshells as added grit sources. I also advise burying a few larger fragments of eggshell or corrugated cardboard in the coir, as worms like to breed and lay eggs in the shelter these provide.
It might be useful for you to pick up a worm farm thermometer as well. It’s not required, but if you have wildly fluctuating temperatures, it helps. Red wigglers like between 60-80 degrees Fahrenheit, and if it’s too hot or cold they don’t do as well!
Common Problems And Questions
Q: My worm bin stinks! How can I fix it?
A: Your worm composter should not smell bad. Ideally, it will smell like garden soil, or perhaps whatever you’re feeding them if you’ve just fed your worms. If it starts to develop a bad odor, there’s probably too much food in there for your existing colony, and it’s starting to rot. If this happens, stop adding food until the worms have broken down what’s there.
If the worms still aren’t eating quickly, your waste may be too large for them to break it down quickly. Try finely-chopping your food waste to make it easier to eat. Some people even make worm smoothies by blending their kitchen waste into a pulp. You can easily freeze finely-chopped or blended worm food and give it to them as needed.
It’s also possible that you don’t have enough worms. 2,000 worms will break down about a pound of food waste and bedding material per day — but they definitely eat their bedding along with the food, so they’re really only breaking down part of the food you’re giving them every day. The worms do rapidly breed and can double their numbers in about 90 days, but a new colony is going to eat more slowly than an established one.
Q: How can I keep fruit flies out of my worm bin?
A: Fruit flies and other insects can show up when the food is too close to the surface and provides a tantalizing temptation. You can prevent this by lightly burying food scraps in the bedding an inch or two under the surface. You can also use a piece of damp cardboard or a few sheets of dampened newspaper on top to act as a block for other insects and to keep the bedding moist. And some bins have pest-prevention built in, like the Urban Worm Bag‘s zippered top!
Q: Why are my worms trying to escape?
A: If worms are crawling up onto the sides and lid of your bin, there’s a few possibilities for why that’s happening. The bedding might have become too acidic. Reduce the quantity of citrus peels, pineapple scraps, etc that you’re putting in the bin. Adding some crushed-up dried eggshells can also reduce the pH level of the bin, which should make your worms happy.
It may also be too hot or cold in the bin . Worms perform best at temperatures between 60-80 degrees, so aim for that temperature range. And finally, it might be too wet or too dry. If you pick up a handful of the bedding and squeeze it, it shouldn’t drip but it should be moist to the touch. If it’s wet, you should drain off any liquid that’s accumulated.
Q: I have mold or sprouted seeds in my bin, is that bad?
A: Sprouted seeds aren’t a problem at all, just turn them under your worm bedding and the worms will feast on them. However, mold is another sign that your worms have too much food and it’s rotting before they can eat it all. You can prevent molds from forming by burying the food an inch or two under the bedding’s surface, and adding some moistened newspaper or cardboard over the top to help keep mold spores out. If you still get mold, whitish molds can usually be turned under the surface of the bedding and the worms will eat them, but black or green molds should be removed entirely and disposed of so they don’t spread.
Overall, the best unit for most people to look into, whether they’re a newcomer to vermicomposting or a pro, is the Urban Worm Bag. It’s easy to set up, extremely easy to use and maintain, and it’s simplicity itself to harvest your finished castings. But whether you start with that or any other system, worm composting is a great way to produce high-quality compost for your plants. I hope you give it a try!


