
Wheat is a major food crop and has been cultivated all around the world for thousands of years. There are all types of wheat and they each have their characteristics on what their flour is best suited for such as in pasta, bread, or pastries. Today we will focus on growing wheat that is best used for baking bread!
Growing your own wheat grain takes you one step closer to self-sufficiency and the end results are worth the effort. Imagine pulling a hot loaf out of the oven, baked from the flour you grew, and slathering that baby with butter. My mouth is drooling just thinking about it!
We encourage you to devote a patch of your garden space to grow wheat. One pound of wheat seed can produce 1.5 bushels of grain, equal to about 90 pounds of grain! There is a whole process to planting and harvesting, so let’s dig in and explore this highly valued grain.
Good Products At Amazon For Growing Wheat:
- Southern Ag Liquid Copper Fungicide
- Bonide Sulfur Fungicide
- Neem Bliss 100% Cold Pressed Neem Oil
- Monterey BT Bacillus Thuringiensis Larvicide
Quick Care Guide
| Common Name(s) | Common wheat, bread wheat |
| Scientific Name | Triticum aestivum |
| Days to Harvest | Spring wheat 120 days, Winter wheat 240 days |
| Light | Full sun |
| Water | Low water |
| Soil | Well-drained loamy soil |
| Fertilizer | 1- 2-1 NPK or compost |
| Pests | Aphids, armyworms, and stinkbugs |
| Diseases | Bacterial leaf streak, basal glume rot, ergot, powdery mildew, rusts, and wheat mosaic |
All About Wheat

Triticum aestivum is the scientific name for the common wheat, also known as bread wheat. It comes from the grass family, Poaceae. The origin of wheat is vague but many speculate that it was first harvested for food in the Middle East. When you are looking for seeds for your garden, you’ll come across wheat varieties such as beardless winter wheat (Triticum hybernum), spelt wheat (Triticum spelta), or einkorn wheat (Triticum monococcum). These are all useful and have many purposes, but are not bread wheat.
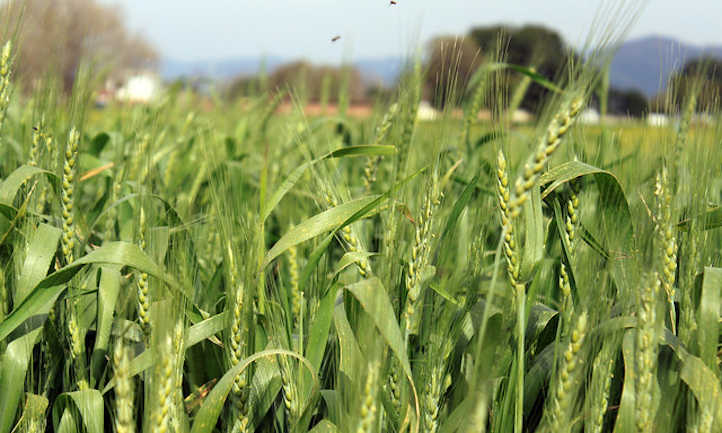
Triticum aestivum is an annual grass that can grow 3-5 feet tall. The stems are narrow stalks, with alternating leaves that are flat and long. The top 2-4 inches of the grass are the spike or flowering heads. At maturity, the head is full of 30-50 of the much-desired grains.
The life cycle of wheat begins at germination, which takes about 5 days. Seedlings will emerge and develop their first true leaves and stems. Several stems may emerge from one seedling. These are called tillers. Each of these tillers can grow into a mature wheat plant. Then the plant will focus on stem development. You will see joints or nodes, and this is where the stem will extend from. Leaves will begin to lengthen and curl slightly. The head of the grass will emerge from the sheath of the last leaf and will begin pollination. Then grains will begin to develop and start ripening for harvest.
The microgreens and the grains, aka wheat berries, are the most popular parts of the plant used for culinary purposes. The young sprouts are also edible for human, dog, and cat consumption. Your fur baby might enjoy gnawing on some young wheatgrass blades, and humans juice it to get wheatgrass juice shots. Other purposes include using the straw as a garden mulch, animal bedding, or packing material.
Tillering is an important part of wheat growth. This is when wheat, about 2-3 weeks after germination, begins to develop additional stalks beyond the first ones it put up. As each stalk only produces a single head of wheat, you want each plant to produce a bunch of them! To facilitate this, make sure before planting that your soil is amended with nitrogen and that it is loose and friable. After planting, make sure moisture is consistently applied and that the weather is not too hot or cold. A happy wheat plant will produce a lot of tillers, and the more tillers, the more heads you’ll have in the future.
Growing wheat for food is satisfying and fun. It is recommended to start small with your plot so that you can pay special attention to its growing characteristics in your region.
While you are searching seed catalogs, you will find bread wheat has a collection of diverse types. Some of these include hard spring, hard winter, and soft winter.
Types of Wheat

There is an amazing range of wheat varieties and it is easy to get caught up in all of their flour qualities. Let’s break down the differences in winter, spring, hard and soft wheat!
Winter wheat is planted in the fall. It should grow 4-6 inches tall before the winter season sets in. The roots will overwinter and start growing in spring. This will be the highest yield of the wheat varieties and the grain will be ready to harvest in May-July.
Spring wheat is planted, you guessed it, in the spring! It will be ready to harvest in the fall. Hard red spring wheat tends to be one of the highest protein-content wheat varieties.
Hard wheat varieties have more gluten in them and are great for bread making. Soft wheat varieties have less gluten in them and are preferred for pastries, crackers, and biscuits.
Then there are other wheat varieties such as durum wheat, which is preferred for making pasta, and einkorn wheat which is known for its nutty flavor.
Planting Wheat
Now let’s cover the basics on when, where, and how to grow wheat.
Most wheat is a cool-season crop. Winter wheat should be planted 6-8 weeks before the first fall frost.
Spring wheat can be planted once the ground is ready to work in early spring. This can tolerate heat better, but still should be able to develop before it reaches scorching temperatures.
Wheat grows best in full sunlight, in well-drained loamy soil. Typically this plant is grown in the ground but some choose to grow wheat in raised beds or in large containers. For small-scale wheat growing, a tight planting of 25 plants per square foot can be done. A slightly larger garden patch of 100 square feet can yield 50 pounds of wheat.
When you are ready to plant, you will want to broadcast the seeds in two directions. For example, the first broadcast from east to west. The second broadcast will go from north to south. Rake and cover the seeds with 1 inch of soil for spring wheat and 2 inches for winter wheat. Pack or firm down the soil, to make the seeds nice and snug.
Care

Now let’s go over some basic needs such as sun, temperature, and water that will help you grow wheat successfully. Soon you will be ready to start farming your own wheat!
Sun and Temperature
Wheat is a sun lover. The more sun, the more productive it will be. Full sun is ideal with at least 6 hours of direct sunlight.
This plant is adaptable to many climates and thrives in USDA growing zones 7-10. The key to growing your wheat crop is deciding if you are planting in the fall or in the spring. The ideal temperature for wheat to grow is 55-75 degrees Fahrenheit.
Wheat is tolerant of cold temperatures but root growth will slow during these times. For extra protection, cover your plot with mulch during the cool seasons to keep the soil temperature and roots warm.
Hot weather over 95 degrees Fahrenheit can put your crop into shock. When the weather is hot, wheat needs more of everything to survive, and even that may not be enough to allow for evaporative cooling around the plants. Grain also may not fill out properly in hot weather. To avoid this, it’s essential that you can harvest your grain before the weather starts to get over 95. In much of the southern or western US, that means you should grow your wheat as hard winter wheat rather than hard spring wheat.
Water and Humidity
Wheat has a low need for additional water once established, provided that the weather is cool. If your region gets 12-20 inches of rain during the growing season, your wheat should thrive. If you feel the need to water, try watering in the early morning or evening. Give a good soak every 2-4 weeks at the base of the plants. Make sure that the soil is well-draining, as excessive soil moisture can create conditions ideal for diseases.
If you can, using drip irrigation under small plantings of wheat is wonderful. This method is not used in commercial agriculture but works wonderfully if you’re just growing small quantities as an ornamental or a cover crop. As there is more sun exposure on the soil at the base of small plantings, you’ll need the extra water to keep things moist. Mulch can provide a similar benefit.
Soil
Wheat loves well-drained loamy soil. This plant can grow in all sorts of soil types but does not thrive in acidic or poorly drained soils. The ideal soil pH for wheat is between 6.0-7.0.
Fertilizing
Fertilizer can be added to poor soils and amp up the yield for your crop. Phosphorous is the most essential for early root and tiller development, but your wheatgrass will also require some nitrogen for early foliage development. If you are planting winter wheat, an application of nitrogen in early spring at green-up is usually fine. Be sure that phosphorous is already in the soil at the time of planting.
Do not attempt to foliar feed wheat. This can cause leaf scorching and results in major damage to your crop. Using granular fertilizers or a liquid application at the plant’s base is best.
Pruning/Training
Pruning and training are not necessary for growing wheat.
Propagation
The only way to propagate wheat is by seed. You cannot grow wheat any other way.
Harvesting and Storing

You will notice that the stems will start to bend from the heavy grains and the grass will turn brown… that means it is close to harvest time! There are several elements required to properly harvest and store your crop but soon you can start baking.
Harvesting
You will need to test the grains to know if it is ready to mature. Farmers will pop a few grains out of the head and either pinch it with their fingernails or put it in their mouth. You are looking for a firm, crunchy to hard texture. If the seed is soft, check it every day until you get hard kernels.
A small plot, less than 150 square feet, can be harvested by hand by picking off the heads. Larger plots will require tools such as a scythe and a cradle, or a sickle. Dry the harvested crops in the sun for 7-10 days.
After the harvest has dried, you are ready to start threshing the grain off the heads and remove the chaff. There are several techniques to threshing by hand, such as flailing, beating in a clean bin, or on a tarp. If you only have small amounts of wheat, place the heads in a plastic bag, tie the bag tightly around the stalks, and beat it on the ground to knock the seed out. Next, you can begin winnowing the chaff and debris from the grain. The easiest way to do this is to set up a box fan and slowly pour your wheat between two buckets, allowing the fan to blow the chaff away.
Storing
You will want to avoid heat, light, moisture, and infestation from spoiling the grain. If you have a small harvest, freeze the dried grain and it will last for several years. If it is fully dried out, you can also store it in a food-safe 5-gallon bucket with a few silica packets to absorb any residual moisture. Commercial sellers often ensure it’s thoroughly dried and then sell it in burlap bags or ventilated poly bags, but those can allow rodents to find and eat your stockpile!
Troubleshooting

Sometimes wheat will not grow how we expect it to. We will cover some common factors that may limit your harvest and recommend how to treat these problems.
Growing Problems
The timing of planting can impact the success of your winter or spring wheat. If winter wheat is planted too late, the roots will not have developed enough to survive winter weather. Similarly, if spring wheat is planted too late, it may not produce large quantities of grain due to heat.
Weather such as heavy rains and high humidity can impede the growth of wheat. If you live in a region that is exposed to excessive moisture, try to find a high and dry spot to grow your crop and amend the soils to make it well-draining.
Too much nitrogen can stunt the plant. To minimize this, avoid using nitrogen-heavy fertilizers and manure. You may want to consider companion planting between wheat rows with plants that feed heavily on nitrogen such as spinach or lettuce.
Pests
Aphids are common garden pests, you may see their little bodies crowded on the leaves. The leaves will start to curl and streak in yellow or white, and the growth will slow. Use a hose to spray the aphids off the leaves and for high infestations, and apply an insecticidal oil such as neem oil.
Armyworms, particularly western striped armyworms, will leave big notches in the leaves or eat them entirely. The eggs are laid on the leaves and look like fuzzy moldy patches. An application of Bacillus thuringiensis can control the infestation.
Stinkbugs attack the head and seeds. Active weed management is required to remove any places that they are living in and you can apply diatomaceous earth on plant foliage and garden soil.
Diseases
Many wheat diseases are difficult or impossible to treat such as bacterial leaf streak, which will leave lesions and black streaks on the leaves. Ergot is a fungus that is toxic to animals; the grain will appear purple or black, with a white interior. Basal glume rot will infect the grains with dark spots coming from the stem. Wheat mosaic virus will leave yellow streaks on the leaves and they will curl and dry up. These diseases require the removal of infected plants, completely clearing the crops and litter from the garden after harvest, and a crop rotation of disease-resistant plants.
Rusts will leave brown spots on the leaves and stems, and the leaves will start to yellow and brown. Thankfully, in many cases the application of sulfur or liquid copper fungicide will treat the rust, although not in all cases.
Powdery mildew emerges if there is a combination of high humidity and warm weather. Typically the spores will stick better to damp foliage, so watering at the base of plants can reduce its spread. Treat with neem oil or a liquid copper fungicide.
Frequently Asked Questions
Q: How long does wheat take to grow?
A: It depends. Spring wheat takes 120 days to grow, winter wheat takes up to 240 days to grow.
Q: Does wheat need a lot of water?
A: Nope, this plant thrives in drier conditions. You still want to make sure it gets consistent water when it’s very young, but once it is mature it needs considerably less supplemental water.
Q: How much wheat makes a cup of flour?
A: About ½ cup of grains makes 1 cup of flour. This is approximately a compact 5 square feet garden patch.


