
We grow plants to feed ourselves, but the gardens we create are also dining rooms for pollinators. Birds, bees, and other insects rely on our gardens for food – just as we rely on them for pollination. Of the many pollinators out there, one of the most effective, and beautiful, is the hummingbird. These tiny speedsters will pollinate hundreds of flowers daily, so it’s no wonder that many gardeners want them in their yard. What better way to do that than by providing a sweet treat in a DIY hummingbird feeder?
Hummingbirds are hungry creatures. In just one day, they can eat up to 3 times their body weight! Clearly, a homemade hummingbird feeder filled with sugar water is just the appetizer. The hummingbirds it attracts will move on to pollinate your garden. The best part? Hummingbirds will come back to the same place each year, so you’re making friends for life!
So let’s let these colorful birds know that we’re up to the challenge of feeding them – without breaking the bank. In this article, we’ll go over 4 simple, DIY hummingbird feeder designs that will turn your garden into a plethora of pollination.
How To Attract Hummingbirds To Your Feeder
There’s no point in having a hummingbird feeder if the hummers can’t find it! Thankfully, we know quite a bit about and have ways to attract hummingbirds.
Hummingbirds rely heavily on sight and love bright colors, particularly red. So, the basic rule of attracting hummingbirds to your homemade hummingbird feeder is to use that color. If you want to add a second color, choose yellow. You can also hang red ribbons around the bird feeder to grab the hummingbirds’ attention.
Along with vivid colors, hummingbirds will search for flower shapes. Putting some sort of circular shape around the bird feeder hole will help them locate the sugar source. The red lid on the soy sauce bottle used in one of our DIY hummingbird feeders is perfect for this!
Help the hummers feel comfortable in your yard by putting the homemade hummingbird feeder out of reach of cats and other predators. Open areas up high are best so the hummers have plenty of room to fly around.
You wouldn’t guess it by their small frames, but hummingbirds are very territorial. One hummer may claim one of the homemade bird feeders and guard it from other birds. If you’re looking to attract lots of hummers, you’ll likely need to hang multiple hummingbird feeders at least 15-20 feet apart.
Some hummingbird enthusiasts will add perches on or near the hummingbird feeders.
Hummingbirds like to perch after eating so they can digest (who doesn’t like to relax after a big meal?). They’ll also preen their feathers, sleep, and guard their territory from perches. So, some hummingbird enthusiasts will add perches on or near the hummingbird feeders. However, perches may also attract larger birds that scare the hummers away. So, if you use perches, you may want to use tiny, twig-like ones that only support hummingbirds. Alternatively, you can put a bird feeder on the other side of the yard so the larger birds have their own space.
Lastly, hummingbirds will appreciate a shallow birdbath. Sugar water is their food, but it doesn’t keep them hydrated. So, the little hummers will much appreciate a drink with their meal.
4 Easy DIY Hummingbird Feeder Builds
We have four easy hummingbird feeder designs to share with you. From a simple soy sauce bottle to an industrial feeding station, each of these project ideas are sure to be a hit with the hummingbirds!
Soy Sauce Bottle Hummingbird Feeder
Perhaps the best, easy to make, homemade bird feeders only need 2-3 things:
- A Kikkoman soy sauce bottle (the brand matters, as it comes with a restaurant-style lid!)
- Wire
- Pliers (optional)
The Kikkoman brand is only 1-2 dollars and is perfectly designed for a homemade hummingbird feeder (it’s almost like they did it on purpose!). When the glass bottle is hung upside down, the liquid will be easily accessible through the two, beak-sized openings in the cap.
You can get creative with hanging the bottle hummingbird feeder. We looped wire around the homemade hummingbird feeder from the smallest to largest part with extra left at the end. You can buy a hand-bendable wire or, for convenience’s sake, simply unwrap a wire clothes hanger with pliers. After wrapping up the feeder, loop the extra wire around a tree branch and ensure that the bottle is hanging straight down. The low air pressure inside the plastic soda bottle will keep the nectar from leaking out of the DIY feeder.
Mason Jar Hummingbird Feeder
Mason jars are synonymous with DIY projects, so we might as well make a hummingbird feeder with one! Here’s what you’ll need:
- A shallow mason jar
- A hanging mason jar lid like this one at Amazon’s website
- A red plastic folder
- Scissors
- Hole punch
To get started, we’re going to replace the flat jar lid with a circle cut from the plastic folder. After tracing and cutting it out, use the hole punch to add some access points the birds can sip nectar from. Set the plastic circle inside the metal screw band and secure them on the nectar-filled jar.
You can now hang the jar upright from a tree branch or other perch. Since the hummingbirds will be feeding from above, you may need to top off the nectar frequently (empty bird feeders won’t do!).
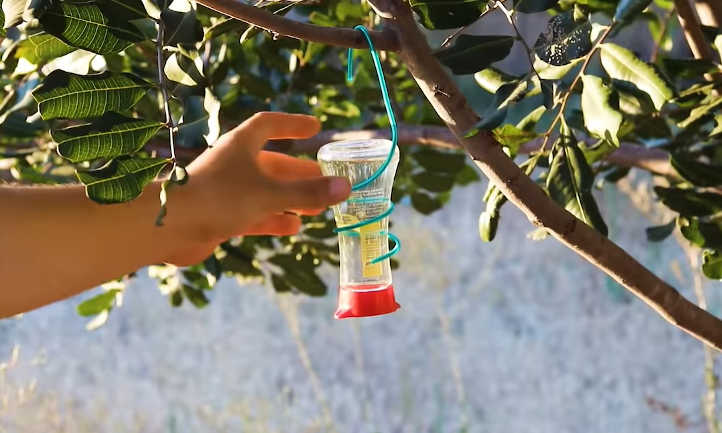
DIY Kid-Friendly Plastic Bottle Hummingbird Feeder
Though not as durable as the previous hummingbird feeders, this is a simple, crafty project that can be a lot of fun for kids. Plus, you likely already have the materials for this easy diy feeder made from recycled, plastic, water bottles. You’ll need:
- Any size of water bottle or soda bottle (with the cap!)
- A red or yellow bendy straw
- Wire
- A drill
- A red plastic folder or construction paper
- Scissors
- Adhesive glue
Begin by drilling a straw-sized hole in the water bottle cap. While you do this, have your child cut out a flower shape from the red folder/paper. The flower should be large enough to fit around the straw. Punch a hole in the center of the flower.
Next, thread the long end of the bendy straw first through the flower and then the cap. Fit it so the water bottle cap and flower are both sitting right at the beginning of the bend in the straw. The long end is going to be inside the water bottle, so trim it to a third of the bottle’s length.
Use glue to secure the cap and flower in place. Fill in any gaps around the straw so the hummingbird food won’t drip out. While the glue dries, wrap wire around the bottle with a loop at the bottom (it will be hanging upside down).
Once the glue dries, fill the bottle with sugar water and twist the cap in place. Hang the bottle hummingbird feeder upside down and bend the straw end to the side for easy access. Now, your child can sit nearby and watch the hummingbirds eat from the water bottles!
Homemade Hummingbird Feeder for Multiple Birds
If you’re going to be feeding the hummingbirds, why not go all out and build them a banquet table? This DIY project is a bit more work than the other, but very rewarding. Start by gathering up:
- Thin PVC pipe (at least a foot long)
- 2 PVC end caps
- Wire
- Red paint (and a paintbrush!)
- A drill
Get started by drilling small holes every few inches across one side of the PVC pipe. The pipe is going to be hung horizontally and filled with nectar, so all the holes must be along the top. Next, paint a red flower at each hole, with the hole at the center.
Once the paint has dried, cut two long lengths of wire and take everything out to the designated tree branch. One end of the pipe at a time, wrap the wire around the pipe, loop it over the tree branch, and wrap the rest back on the pipe. Ensure that the holes in the pipe are facing upwards.
Finally, fit one end cap onto the pipe and pour sugar water into the other end. Keep in mind that the water level must be below the holes to keep from leaking. Once full, secure the other end cap. Now your homemade hummingbird feeder is ready for a whole swarm of hummingbirds!
DIY Hummingbird Nectar Recipe

You don’t need a store-bought mix to make hummingbird nectar. All it takes is water and cane sugar! Store-bought mixes typically have additives, such as red dye, that can be harmful to the hummingbirds. Sure, the red color may seem more appealing to the hummingbirds, but it’s unnecessary since the hummingbird feeders are already colored.
To make hummingbird nectar, simply mix one cup sugar with three cups of room-temperature water. You can heat it up to better dissolve the sugar, but it should dissolve perfectly well at room temperature.
Keep in mind that sugar water attracts ants, so make sure your hummingbird feeder isn’t dripping. The nectar may also attract bats and bears at night, so you may want to bring the hummingbird feeder inside when it gets dark.
Frequently Asked Questions
Q: Is homemade sugar water bad for hummingbirds?
A: No, DIY nectar is actually better than most store-bought nectars because it doesn’t have artificial dyes.
Q: Do hummingbirds prefer bird feeders with perches?
A: They may appreciate it, but perches bring their own problems. Often they’ll end up attracting larger birds that scare the hummers away from the hummingbird feeder.


