
If you’re anything like me, you love to bring the outdoors indoors. Air plants are a fantastic way to do that. These resilient, low-maintenance plants don’t need soil or rocks to live in, nor do they need an exotic stand. In fact, you can easily DIY an air plant display out of virtually anything you have on hand and in any style!
A gorgeous display can be had simply by setting your air plants into seashells if you like beach style. For someone aiming for a modern aesthetic, a spiral of wire can make a stylish holder. Glass terrariums are available if you’d like your plants displayed in a dust-free environment. If you’re crafty, you may be able to create holders using a macrame plant hanger and then hang the rope up. But I like a more natural vibe, and so I repurpose driftwood, bark, moss-covered boards, or other natural materials as holders.
Let’s talk about what you’ll need to mount and display your air plants. There are many ways to display them, but take the time to get creative. Air plants can be a creative, fun, and easy-to-care-for living decor element in your home!
Good Products From Amazon For Air Plant Displays:
- E-6000 Adhesive, Clear
- 12-Pack Mixed Tillandsia Ionantha Air Plants
- emours Reptile Decor Natural Forest Branch
- Ultra-Fine Mister Bottle
- Optional: 18-Gauge Aluminum Wire
Materials You’ll Need

There’s a variety of different components you’ll need to do this project. Let me provide you with detailed tips on each element.
Selecting Air Plants
When making an air plant holder, you will of course need air plants!
I like to source my air plants first when planning a project like this. They will just as happily live in a cereal bowl for a few days as they will in a terrarium or in decorative planters. There are many species of air plants to choose from, just like there are many air plant display ideas. Search to find ones you’ll enjoy!
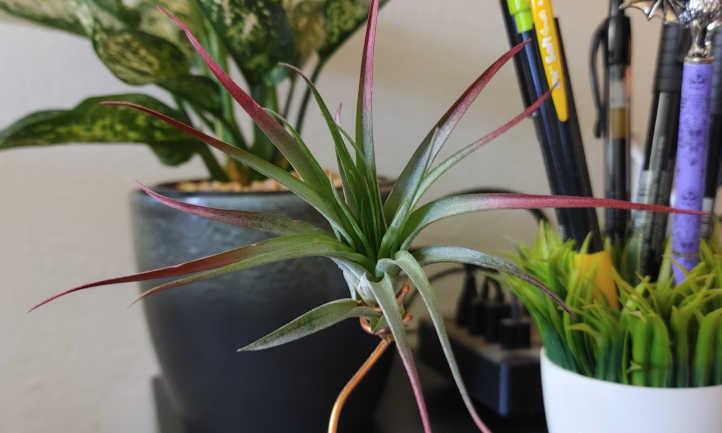
For this project, I opted for Tillandsia ionantha. This species of air plant is indigenous to parts of Mexico, Costa Rica, and other parts of South America. A type of bromeliad, these are rootless plants that absorb most of their nutrients through their leaves. There are a wide array of varieties to choose from, all of which share a particular trait: as they get ready to bloom, the silvery-green hue their succulent-like leaves usually are shifts to a vivid red-pink color at the tips. My Tillandsia ionantha selection included varieties like Fuego, Guatemala, Mexican, Ruba, and Scaposa.
How many plants you’ll need to buy depends on how big of a display you’re making. If you’d like to save a little money while doing it, buying multiple often is the best value. I chose a mixed dozen from the above varieties and waited for them to arrive to see how big they would be. You can find these online or order from an air plant nursery if you can’t find them local to you.
Once they had reached me, I carefully unpacked them and set them on a table to get a sense of the size. I knew that most of these would be 2-4 inches in size when I ordered, but when they arrived, only one reached the 4″ mark; most were in the 2″ range. That gave me a good idea of how large of a display I’d need if I were to combine them all together.
Rustic Displays From Woody Materials

I knew I wanted a rustic display. Driftwood was an option, but I didn’t have time to get to the nearest beach to look for any, so I opted for something a bit more local. As I live in wine country, locally sourced grapewood is easy to come by. This dense vine wood also twists into interesting shapes, and often has lots of knots or holes from years of pruning. I knew it’d be the perfect way to display my tillandsia plants.
If you like a natural look but less vine-like, a sheet of cork bark like the ones sold at local pet stores for fishtanks or reptile enclosures would also be a great DIY surface to display air plants on. Look for one with some deep nooks and crannies that you can tuck the bases into. Even an old, weathered frame can be used to mount plants as an indoor display.
Remember, these are being mounted onto something permanently; look for something that can tolerate being soaked in water! While air plants do not need much water, they do need some, and whatever you’re attaching them to must be able to get wet. Most of the time, you will simply mist them with a spray bottle, but every so often, they want more water than that to keep them beautiful. If you can’t find something suitable that’s waterproof, you may want to make wire holders for each individual plant so you can remove the plants for an occasional 20-minute soak every couple weeks.
My grape wood, along with most branches sold at pet stores for reptile cage use, can handle getting wet. This made it absolutely perfect for this purpose.
If you want to hang it on the wall, figure out a hanging system in advance for your display. That way, you can plan out the placement of the air plants properly.
Other Materials

You now have your materials for your air plant holder, mostly. But how do you plan to mount them?
If your item isn’t waterproof, you’ll need metal wire, as I mentioned above. A heavy-gauge craft wire is just fine. Try to avoid copper as it can discolor the base of your plant over time. A nickel or steel wire is great, as is aluminum. Choose a nice-looking metal if you’d prefer something shiny, or consider a coated wire in a bright color for something a bit more playful and fun.
When using wire, you will also need a drill, as well as a drill bit the same diameter as your wire. Pliers and wire cutters may also be very useful.
The only other thing you’ll need is glue. There are two options that are safe for air plant use. Both result in a somewhat flexible bond once the plants are attached, allowing for plant growth.
The one I recommend is an industrial adhesive called E-6000; their adhesive results in a permanent, waterproof bond that does not discolor with age nor become weakened as time passes. It can be a little difficult to find occasionally, so you may have to search for it in local stores. Alternately, you can buy it online through Amazon.
Alternately, hot glue is a very viable option, although you’ll want to be careful that it’s not hot enough to burn the base of your air plants. If you have the option to use low-temperature glue sticks, do so.
Twine or rope can also be very useful in the mounting process but is not absolutely required.
Making Your Air Plant Display

If you have not already done so, figure out how you want to hang it if it’s going to hang on a wall. If you’ll be placing this on a table or shelf, make sure it does not rock on the surface it’s on, as wobbling may cause damage to your plants. Sanding flat parts to make for a flush, flat surface works well.
Prepare your plants, too. Remove any loose leaves, and make sure the base of each air plant is exposed. Give the plants a 20-minute soak in water to fully plump them up, and let them air-dry afterward.
Once the plants are dry, place your display where its eventual home will be. Now is the time to figure out how you’d like it to look when done. Set the plants in place on your driftwood or rustic bark. Take time to inspect every nook and cranny, swapping plants here and there until you find an aesthetically pleasing arrangement. Remember, this is an indoor garden, and you want it to look beautiful in your space!
When you’ve determined where every plant will stay permanently, uncap your E-6000 or heat up your glue gun. If using a glue gun, put a big glob onto your display where you’d like an individual plant to go. If using E-6000, place the blob directly onto the base of the Tillandsia ionantha. As this plant doesn’t have roots, it needs glue to anchor it in place. Try not to get the glue onto the leaves themselves, as leaves may fall off as the plant continues to grow. This is going to be a living arrangement, after all.

Press your tillandsia in place gently, using just enough pressure to make sure it makes full contact. If using E-6000, you may opt to tie it in place with a piece of twine, but be careful not to damage the leaves. Hot glue usually bonds within a few seconds, but you want a little pressure on the E-6000 until it fully sets.
Repeat this process one air plant at a time, making sure that you take time to get it turned in the right way to highlight the best features or shape of each plant. If one fits perfectly in a bent part of the driftwood, or its base is the perfect size to fit into a knothole, consider putting it there. You’re aiming for a natural look as if it were where you might find it in the wild.
If your air plant display can’t be left in water for long, break out that wire. Begin by making a spiraling cone shape that perfectly fits the base of one of your air plants and will support its weight. Then, leave enough wire to create a stem you can use to mount it. Look at your air plant display and find where you’d like that plant to be placed. Then, with a drill bit the same diameter as your wire, drill a shallow hole into the plant display. Fill the hole with glue, then push the stem of the wire into place. You can then remove your plants from the wire for regular soaks!
Caring For Your Air Plant Display

Now that your air plants are secure, their day-to-day care is easy.
If you’re hanging them, remove your plant hanger from the wall or ceiling every day or two and give each plant a spritz with a misting water bottle. About every two weeks, submerge the entire display (or just the plants if you opted for a wire setting) in room-temperature water for 20 minutes to allow the plants to plump up. Once a month, air plants like an air plant-specific fertilizer dissolved into water sprayed instead of their normal misting to give them a little boost. Allow the air plant display to dry before hanging it back up on the wall.
You can have an entire garden of silver-green air plants in a small space. And better yet, you create it to suit your specifications. No soil is ever needed, so you don’t have to worry about planters or your pets spilling soil everywhere. You can even mount these on rocks, or suspend them upside-down inside seashells to make a living “tillandsia octopus” ornament that makes a great, adorable, and unique gift.
No matter how you choose to display your air plants, whether hanging or stationary, in terrariums of glass or on grapewood, it’s easy to bring a little more life into your home!


